Creating a new component
Orion provide a simple command line interface to enhance the DX when contributing to the projet.
This cli will take care of scaffolding a new component by creating the necessary files in the right place.
Don't worry, we use a pretty common architecture with only a slight change on the script part that we explain below.
Our package design philosophy
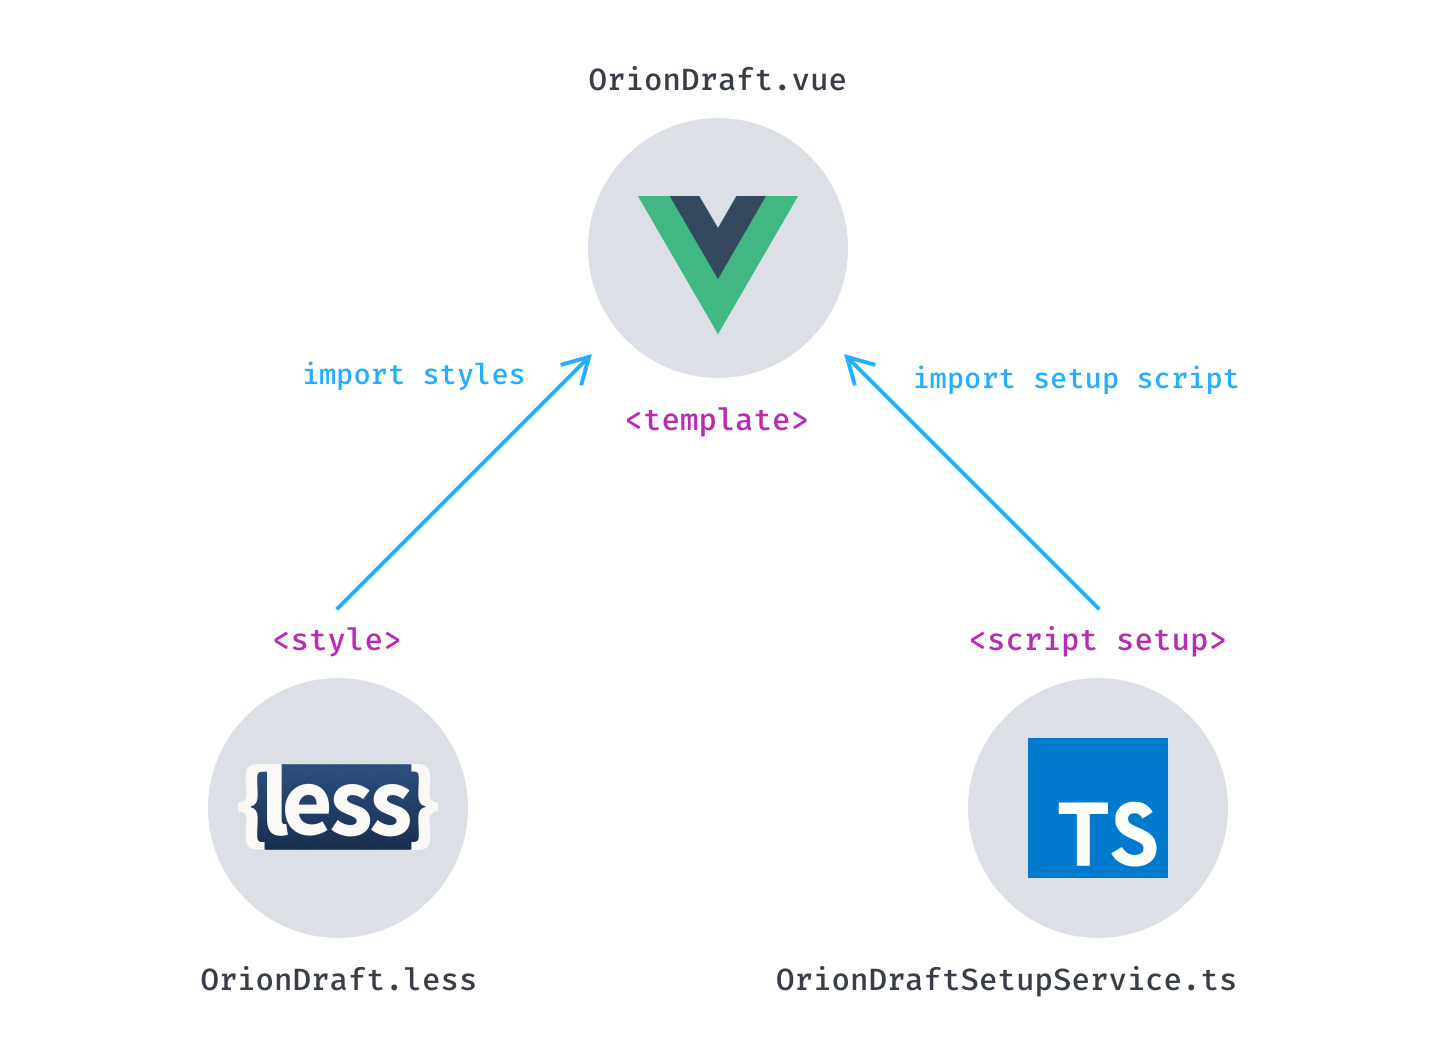
The design is pretty basic, it follows the below schema.
Tips
In order to easy understand the mechanism, let's consider creating a Draft component.

Keep the code clean
The code is divided in 3 files.
The
templatepart obviously stays in the.vuefile.The
stylepart takes place in a separate.lessfile. It aims at keeping the code cleaner and avoidscoped stylewhich make styles overriding easier for people who use Orion and want to customize it.The
scriptpart goes in a.tsfile. This was a hard choice because it's not yet fully supported by Vue.js. Nevertheless it enables us to take full advantage of using typescript features, and specifically classes and inheritance. More on that in the Enhance DX section.
Enhance DX (Developer Experience)
As said many times, we care about DX. That's one of the reasons why we chose to put all the script part in a dedicated typescript class for each component.
This design pattern makes class and inheritance usage a breathe. It also contribute to maintain a clean code, even inside the template.
Wondering how is this possible ?
You juste have to use private or protected attributes in your SetupService class to prevent them from being accessible in template.
For example, if you use VSCode, you'll have a cleaner Intellisense. It helps reducing errors and code complexity while developing your application.
But let's dive into a more concrete example.
The component creation process
We don't want to bore people with naming convention and folder structure. That's why we created a small cli to make the process easier.
# In Orion root
node cli.cjs
Select the package option.
┌
🥨 --> Welcome to Orion CLI
│
◆  Select what you want to do
│  ○ Volar Intellisense
│  ● New package (Scaffold a new package)
│  ○ Create packages index
│  ○ Create services index
│  ○ Create sandbox routes
│  ○ Build lib
│  ○ Create doc's data files
└
The you have to enter the name of your package.
┌
🥨 --> Welcome to Orion CLI
│
◇  Select what you want to do
│  New package
│
◆  What's the name of your package?
│  Package name
└
Tips
Don't worry about the naming convention, juste enter the name.
It will be automatically converted to PascalCase and prefixed with Orion.
┌
🥨 --> Welcome to Orion CLI
│
◇  Select what you want to do
│  New package
│
◇  What's the name of your package?
│  draft
│
◆  🥨 --> Orion created /packages/Draft/index.ts
│
◆  🥨 --> Orion created /packages/Draft/src/OrionDraft.vue
│
◆  🥨 --> Orion created /packages/Draft/src/OrionDraft.less
│
◆  🥨 --> Orion created /packages/Draft/src/OrionDraftSetupService.ts
│
◆  🥨 --> Orion created /docs/components/OrionDraft.md
│
◆  🥨 --> Orion created /packages/index.ts
│
◆  🥨 --> Orion created /lib/packages.d.ts
│
◆  Enter the prefix for Orion components?
│  o_
└
The volar command is then automatically executed to recreate the orion-volar.d.ts file with your new component (more infos on volar command).
Package files
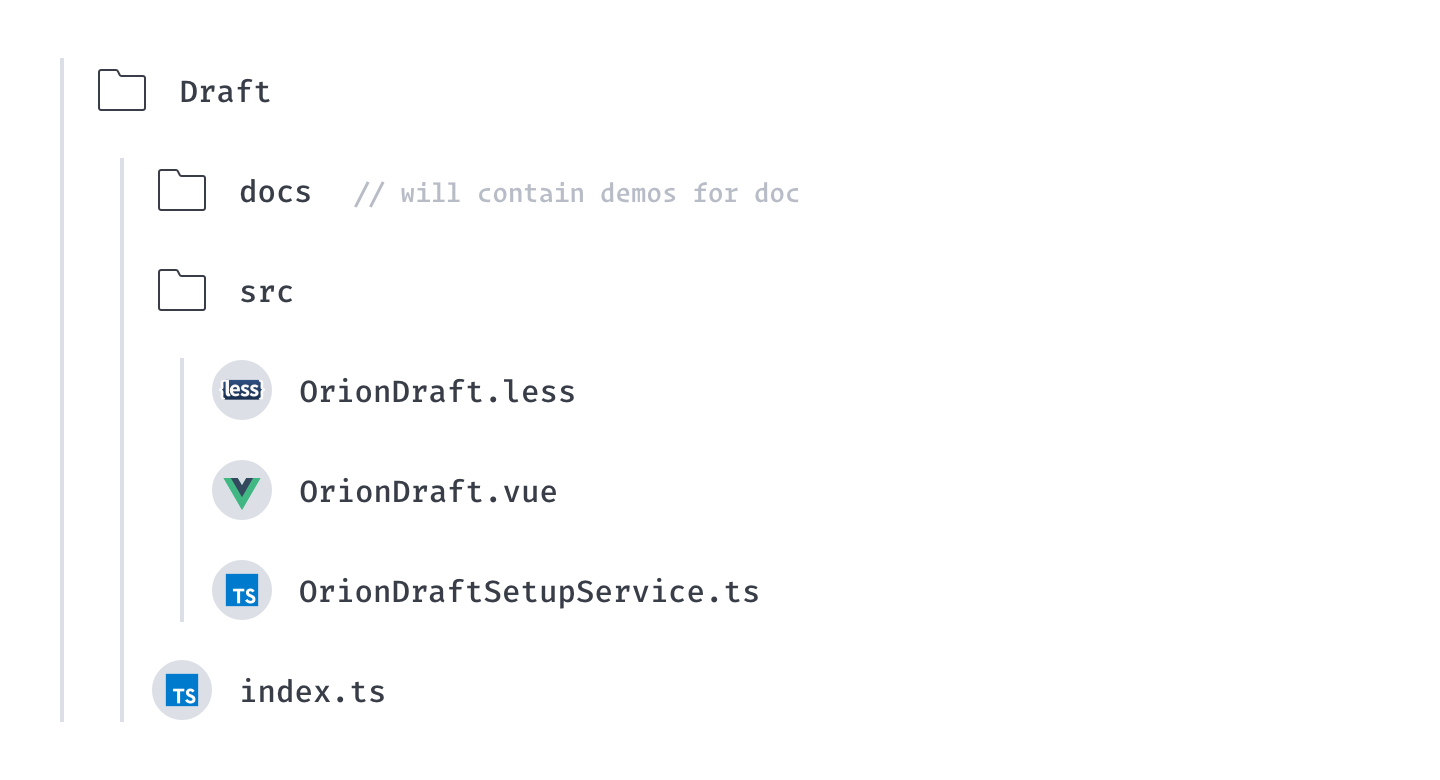
The following folder structure will be generated by the package command.

Tips
These are the 3 main files in which you'll write your code.
<template>
	<pre>OrionDraft</pre>
</template>

<script setup lang="ts">
import './OrionDraft.less';
import OrionDraftSetupService from './OrionDraftSetupService';
const props = defineProps(OrionDraftSetupService.props);
const setup = new OrionDraftSetupService(props);
defineExpose(setup.publicInstance);
</script>
import SharedSetupService from '../../Shared/SharedSetupService';
import SharedProps from '../../Shared/SharedProps';

type Props = SetupProps<typeof OrionDraftSetupService.props>;

export default class OrionDraftSetupService extends SharedSetupService<Props> {
	static props = {};

	constructor(props: Props) {
		super(props);
	}
}
@import '../../Shared/styles/variables.less';
@import '../../Shared/styles/mixins.less';

.orion-draft {
}
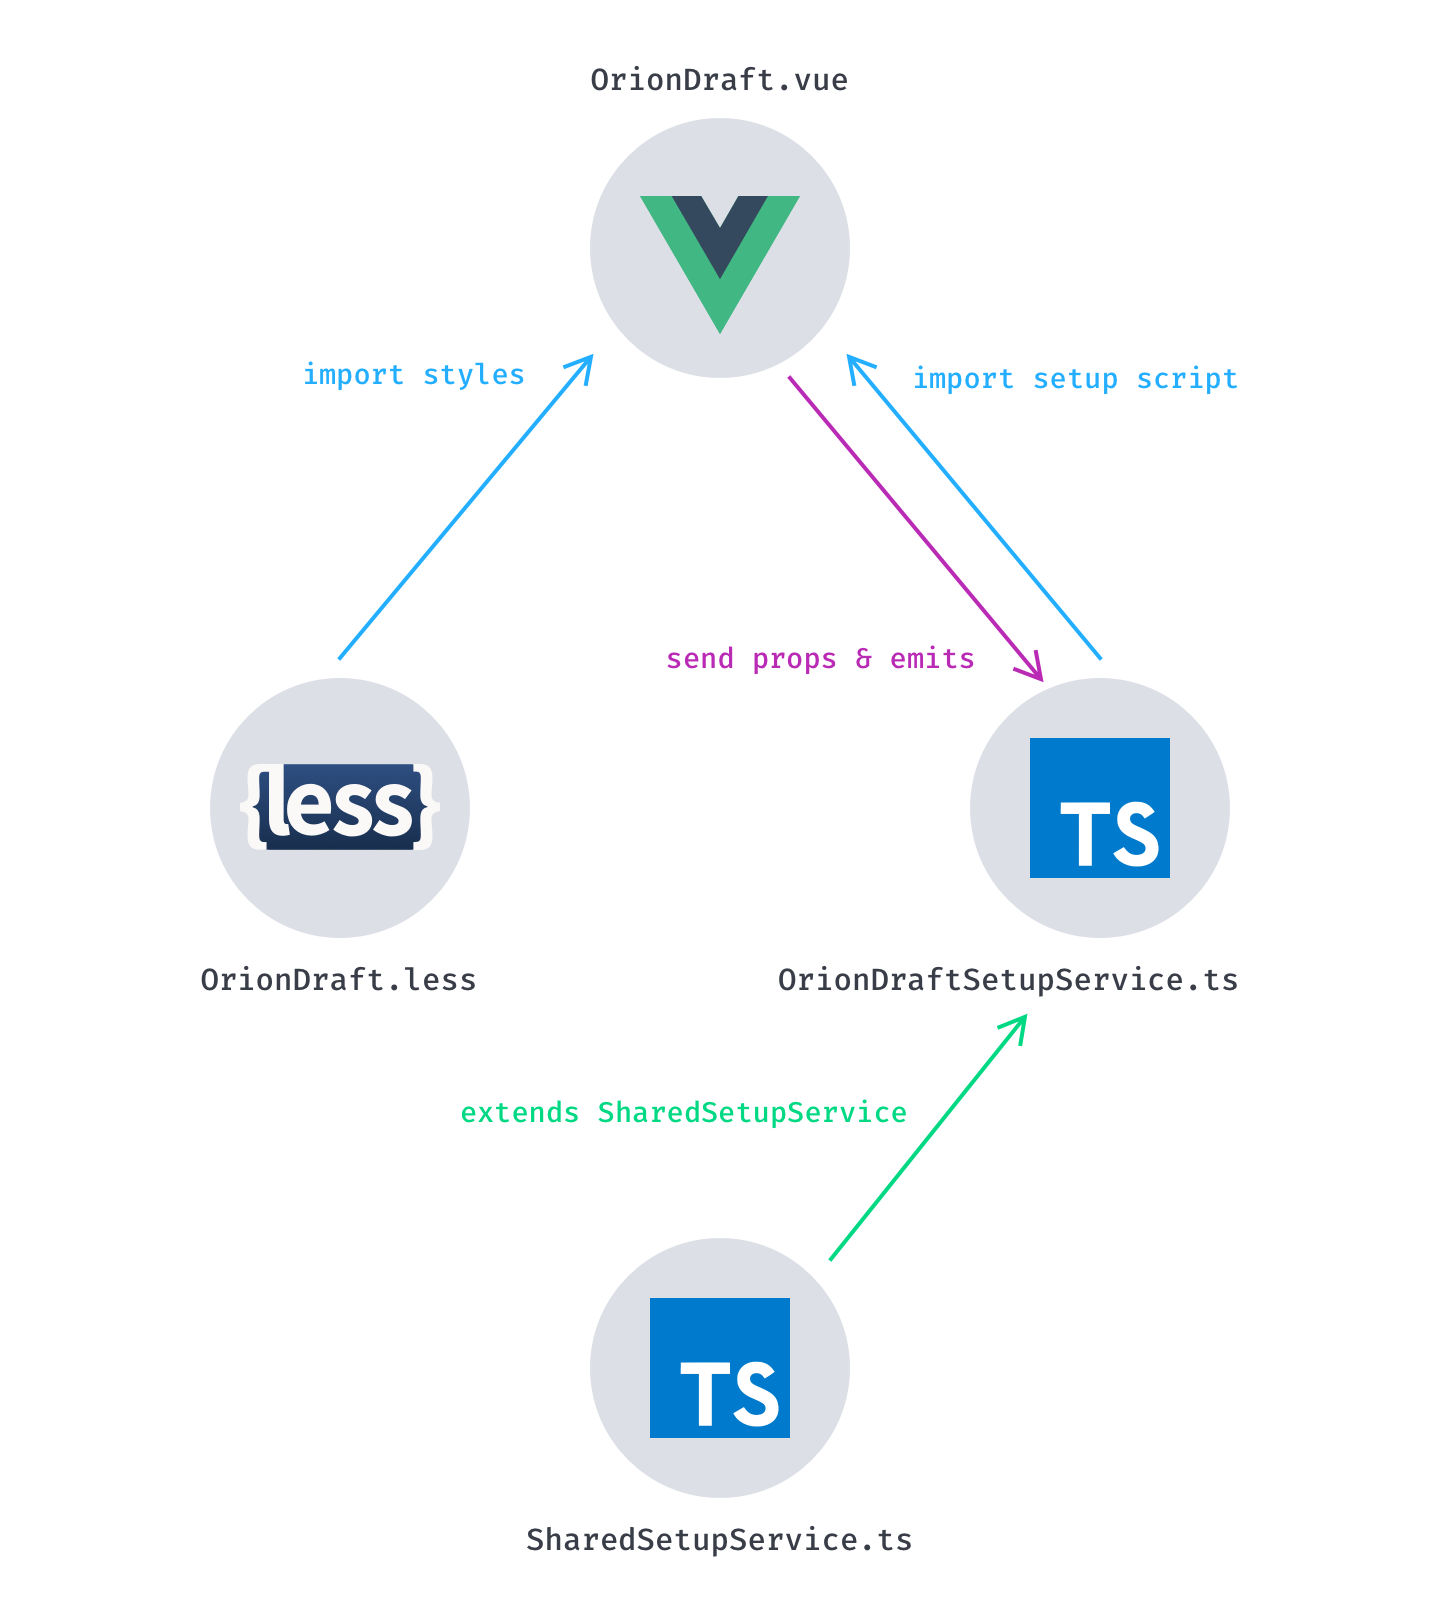
Package structure

SharedSetupService.ts
Every SetupService extends the SharedSetupService class. So, you get the idea...
If something is needed in every component, the SharedSetupService will be the right place to put the code in.
Documentation
Once you've created your new component, don't forget to add documentation for it.
The package command also created the following file : /docs/components/OrionDraft.md
Writing documentation is hard, just try to do your best to explain how your component works, when it can be used, what specific situations it can handle.
Demos
As you probably noticed, every package has a docs folder. It will contains the .vue files for each demos or playground that you want to put in your documentation.
We created a Vuepress/Markdown plugin to easily integrate these demos in the mardown files.
At the end of your code the .vue file, you can add a small descriptionn concerning the demo. To do so, just use the @lang: marker followed by one of the supported languages of the documentation (en for english is required). You can see an example bellow.
Take for example the OrionButton documentation, you'll find the following lines :
::: demo:Button
ButtonColors
ButtonIcons
ButtonPlayground
:::
Basically, the first line is the marker that will tell the bundler to integrate demos at this point.
When parsing the source files, the regex will search for the following expression : ::: demo:
If we take our Draft component example :
::: demo:Draft
Then you just need to specify which demo you want to insert (by writing the demo's file name) :
::: demo:Draft
DraftDemo1
DraftDemo2
DraftDemo3
::: <!-- don't forget to close the demo marker with ::: -->
Then at the end of your .vue file, you must add a quick description which must have a certain template :
@lang:en
### Title of your demo

Description
@lang
Adding your documentation in the menu
The final step is to add a link to the documentation page in the sidebar.
Add your file's path in one of the children array in docs/.vuepress/configs/sidebar/index.ts
The good location will depend on the category of your component.